Network Routing (Port Forwarding)
Understanding how network traffic flows between a user’s browser, your reverse proxy, and the Spokes server is crucial for troubleshooting deployment issues.
Spokes uses a hybrid networking model: standard web traffic is routed conventionally, while real-time voice and video establish direct peer-to-server connections that intentionally bypass your reverse proxy.
The Two Phases of a Connection
Section titled “The Two Phases of a Connection”When a user connects to your Spokes server and joins a voice channel, the connection occurs in two distinct phases.
Phase 1: Signaling (Web & WebSockets)
Section titled “Phase 1: Signaling (Web & WebSockets)”When you first open Spokes, your browser makes standard HTTP requests to your configured Server Public URL (e.g., https://spokes.yourdomain.com).
- Routing: This traffic hits your reverse proxy (e.g., Cloudflare Tunnel or Nginx Proxy Manager).
- Upgrade: The proxy forwards the request to the Spokes server’s Web UI port (internal port
8080) and upgrades the connection to a WebSocket. - Signaling: LiveKit and the browser use this WebSocket to exchange text-based instructions. No audio or video is transmitted yet. They are simply negotiating how to send the media.
Because this phase relies on standard HTTP/WebSockets, it is fully protected by your reverse proxy’s SSL, WAF, and DDoS mitigation.
Phase 2: Media (Direct UDP)
Section titled “Phase 2: Media (Direct UDP)”During the Signaling phase, the browser and the embedded LiveKit engine must determine how to exchange the heavy media traffic (UDP packets). This process is handled via WebRTC ICE (Interactive Connectivity Establishment) negotiation.
- IP Discovery: The embedded LiveKit server automatically figures out your router’s true Public IP address. It does this quietly in the background by pinging a public STUN server (like Google’s).
- The Handshake: LiveKit sends an instruction over the secure WebSocket to the browser: “Send your UDP media traffic directly to my router’s Public IP on port
30000.” - Direct Connection: The browser receives this instruction and starts firing UDP packets directly to that raw IP address, completely bypassing
spokes.yourdomain.comand your reverse proxy.
Why You Need Port Forwarding
Section titled “Why You Need Port Forwarding”This direct media connection is why configuring your router for port forwarding is absolutely critical, even if you are using a secure Cloudflare Tunnel for your Web UI.
When the client’s browser sends UDP media packets directly to your Public IP, those packets hit your hardware router. If you have correctly configured your port forwarding rules, the router intercepts the traffic on ports 30000-30499 and forwards it straight to your Spokes Docker container.
If these ports are closed, or if they are not mapped 1-to-1 (e.g., your router forwards port 30000 to container port 50005), the WebRTC connection will fail, and users will be stuck on “Connecting…” indefinitely.
The Advantages of this Architecture
Section titled “The Advantages of this Architecture”This hybrid approach provides the best of both worlds:
- Security: Your Web UI, APIs, and WebSockets are hidden behind your reverse proxy. Automated bots and script kiddies scanning the internet for vulnerable web servers (ports 80/443) will only see your proxy provider, not your home IP.
- Performance: Real-time voice and video are extremely sensitive to latency. By establishing a direct UDP connection, the media traffic takes the fastest possible route over the internet, avoiding the overhead and potential bottlenecks of passing through proxy servers.
pfSense Specifics
Section titled “pfSense Specifics”To ensure real-time voice and video function correctly, you must forward the LiveKit ports from your pfSense firewall to your Spokes Docker host.
Port Forwarding (NAT)
Section titled “Port Forwarding (NAT)”- Log into your pfSense web interface.
- Navigate to Firewall > NAT > Port Forward.
- Click Add to create a new rule.
Rule 1: UDP Range
Section titled “Rule 1: UDP Range”Configure the rule with the following settings:
- Interface: WAN
- Protocol: UDP
- Destination: WAN address
- Destination port range:
30000to30499(or your custom UDP Range) - Redirect target IP: The internal IP of your Spokes server (e.g.,
192.168.1.50) - Redirect target port:
30000(must match the Destination port) - Description: Spokes LiveKit UDP
- Filter rule association: Add associated filter rule
Save the rule.
Rule 2: TCP Fallback
Section titled “Rule 2: TCP Fallback”Click Add again for the second rule:
- Interface: WAN
- Protocol: TCP
- Destination: WAN address
- Destination port range:
7881to7881(or your custom TCP Fallback port) - Redirect target IP: The internal IP of your Spokes server (e.g.,
192.168.1.50) - Redirect target port:
7881(must match the Destination port) - Description: Spokes LiveKit TCP Fallback
- Filter rule association: Add associated filter rule
Save the rule, and click Apply Changes at the top of the screen.
Double NAT & Local Network Voice Chat
Section titled “Double NAT & Local Network Voice Chat”If you have users connecting to Spokes from the same local network as the server, you will need to enable NAT Reflection (Hairpin NAT) using the following strategy to bypass the Double NAT limitation.
Because Spokes LiveKit requires clients to connect via your external Public IP (or a DDNS domain like DuckDNS), internal clients will fail to connect unless your router loops that traffic back inside.
To guarantee this works flawlessly, you should create a second set of Port Forwarding rules that use your DDNS domain as the destination, bringing the total to 4 rules per instance.
Step 1: Create a DDNS Alias
Section titled “Step 1: Create a DDNS Alias”- In pfSense, go to Firewall > Aliases.
- Create a new IP alias (e.g.,
public_ip). - Add your DDNS domain (e.g.,
yourserver.duckdns.org) to the alias and save.
Step 2: Duplicate Rules with the Alias
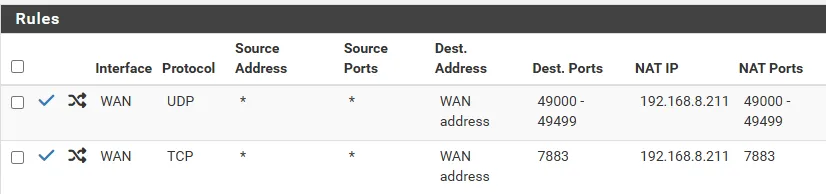
Section titled “Step 2: Duplicate Rules with the Alias”Go back to Firewall > NAT > Port Forward. You should already have your two standard rules targeting the WAN Address:
- WAN | UDP | Destination: WAN Address | Port: 30000-30499
- WAN | TCP | Destination: WAN Address | Port: 7881
Create two additional rules identical to the ones above, but change the Destination from WAN Address to Single host or alias and type in your public_ip alias:
- WAN | UDP | Destination:
public_ip| Port: 30000-30499 - WAN | TCP | Destination:
public_ip| Port: 7881
Step 3: Enable Pure NAT Reflection
Section titled “Step 3: Enable Pure NAT Reflection”Edit all four of these rules, scroll down to the NAT reflection setting, and set it to Enable (Pure NAT).
(Make sure Enable automatic outbound NAT for Reflection is also checked in System > Advanced > Firewall & NAT).
This trick ensures that when a local user tries to connect to your public DDNS domain, pfSense explicitly matches the resolved public IP to your alias rule, intercepts the request, and loops it back to your internal Docker server.
UniFi Specifics
Section titled “UniFi Specifics”To ensure real-time voice and video function correctly, you must forward the LiveKit ports from your UniFi Security Gateway (USG) or Dream Machine (UDM) to your Spokes Docker host.
Creating Port Forwarding Rules
Section titled “Creating Port Forwarding Rules”- Log into your UniFi Network Controller.
- Navigate to Settings (Gear Icon) > Routing & Firewall (or Settings > Security > Port Forwarding in newer UIs).
- Click Create New Port Forwarding Rule.
Rule 1: UDP Range
Section titled “Rule 1: UDP Range”- Name: Spokes LiveKit UDP
- Enable: Checked
- Interface: WAN
- From: Any
- Port:
30000-30499(or your custom UDP Range) - Forward IP: The internal IP of your Spokes server (e.g.,
192.168.1.50) - Forward Port:
30000-30499(must match the Port) - Protocol: UDP
- Logging: (Optional)
Save the rule.
Rule 2: TCP Fallback
Section titled “Rule 2: TCP Fallback”Click Create New Port Forwarding Rule again:
- Name: Spokes LiveKit TCP Fallback
- Enable: Checked
- Interface: WAN
- From: Any
- Port:
7881(or your custom TCP Fallback port) - Forward IP: The internal IP of your Spokes server (e.g.,
192.168.1.50) - Forward Port:
7881(must match the Port) - Protocol: TCP
- Logging: (Optional)
Save the rule. Your UniFi console will provision the new rules to your gateway automatically.